1. Prepare the Windows server
Our recommendation is that the three components of an Axiell Collections on-premises solution are installed on a Windows Server.
Note: A PC running a Windows operating system such as Windows 10 may be sufficient for organizations with a small user base. If you need advice, please speak to your Axiell Support representative.
To prepare the Windows server to run Axiell Collections, it is necessary to set up Internet Information Services (IIS) and the .NET Framework.
Minimum and recommended requirements for the server
Please consult Axiell Collections Technical Specifications and Architecture for details about minimum requirements, including disk space.
Axiell Collections is installed on a computer running any Windows Server or Windows operating system currently supported by Microsoft. It is recommended that the Windows server is in an Active Directory domain. If this is not possible, the Axiell Collections web service, Collections application and database server can be installed in a peer-to-peer network within a workgroup.
Set up the server for IIS and the .NET Framework
Ensure that IIS and the .NET Framework are installed on the server (version details above).
Windows is shipped with Internet Information Services (IIS) and we recommend using the version shipped with the Windows Server or Windows operating system installed. For example:
- Windows Server 2012 R2 is shipped with IIS 8.5
- Windows Server 2019 and Windows 10 are shipped with IIS 10.0
Microsoft .NET Framework must be installed on the server. .NET Framework 4.8 is recommended.
Note that functionality introduced with Axiell Collections 1.10 requires .NET Framework 4.8.
The .NET Framework is installed by default with most versions of Windows. If it is necessary to install the .NET Framework, details can be found here.
Important!
- Install the .NET Framework after IIS has been installed (with the latest security updates) otherwise important features of ASP.NET will be missing from the installation: on a new server, always install IIS before installing the .NET Framework.
- In IIS 7, ASP.NET must operate in integrated mode (this is the default configuration). The application pool created during deployment of the Axiell Collections core software must run in this mode.
Three settings must be enabled:
- IIS Management Console
- (IIS) Management Service
- HTTP Activation
How you enable these settings will depend on the version of the Windows operating system installed. Although it is not possible to document all methods here, the following steps should point you in the right direction:
In Windows Server these settings are enabled by selecting Add roles and features from the Server Manager Dashboard:

- Click Next to move through the Add Roles and Features Wizard until the Server Roles screen displays.
- Locate and expand Web Server (IIS)>Management Tools and ensure that these settings are enabled:
- IIS Management Console
- Management Service

- Click Next to move to the Features screen.
Note: If you find more than one version of the .NET Framework installed, select the latest version (4.8 is recommended). Details about minimum requirements for the .NET Framework are provided above.
- Expand .NET Framework (version)Features>WCF Services and ensure that HTTP Activation is enabled:

- Proceed through the wizard to the end.


IIS is an optional Windows Feature. Optional Windows features are turned on / off via the Windows Control Panel:
- Open the Windows Control Panel.
- Select Programs and Features>Turn Windows features on or off.
- In the Windows Features box expand Internet Information Services>Web Management Tools.
- Enable the two settings:
- IIS Management Console
- IIS Management Service

- Scroll up to locate .NET Framework.
Note: If you find more than one version of the .NET Framework installed, select the latest version (4.8 is recommended). Details about minimum requirements for the .NET Framework are provided above.
- Expand .NET Framework (version) Features>WCF Services and ensure that HTTP Activation is enabled:

- Click OK to install and enable the features.
When IIS is enabled you will have access to the Internet Information Services (IIS) Manager:
Note: If running IIS on a Windows PC, see note below about running IIS as an Administrator.
There are various ways to open the Internet Information Services Manager.
In Windows 10:
- Click the magnifying icon in the Taskbar.
- Type
IIS.
In Windows Server:
- Click the Windows button.
- Click the magnifying icon (typically top right of the screen).
- Type
IIS.
This method should work for most versions of Windows and Windows Server:
- Press the Windows button + R on your keyboard to open the Run window.
- Type inetmgr:
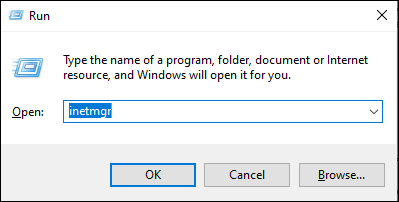
- Click Ok.

Run as Administrator
If using a PC running a Windows operating system (such as Windows 10) rather than Windows Server, it is a good idea to run IIS as an Administrator.
In Windows 10, the simplest way to locate IIS is to search for IIS and select Run as Administrator:

Alternatively, locate the IIS program icon, right-click it and select Run as Administrator.
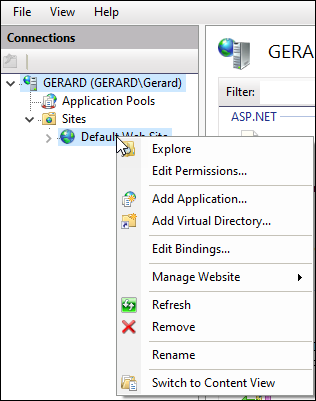
- Expand the top level connection to reveal Default Web Site.
- Right-click Default Web Site to display the pop-up menu:
- If the Deploy option is not listed (as in the example above), download and install the latest version:
- Be sure to choose the 64-bit version for 64-bit Windows.
- Choose the Typical installation.
- Close the IIS Manager and re-open it.
- Check whether the Deploy extension is now installed:

Note: If after installing the Deploy extension it is still not available from the pop-up menu, uninstall it and consult the procedure in the Appendix.